

by Wil C.
Plotter Art at Ignite Studio
There are a lot of different ways to create art, and Ignite has many options to explore traditional art. However, for some, traditional art mediums can be difficult to execute without proper training. This blog will explore some alternative ways to create art through code and machines rather than technical fine arts.
Traditionally, art generated by computer code has been known as “generative art,” but nowadays generative art suggests art created by artificial intelligence. While both are generative, a major difference is that AI generative art can vary wildly when attempted multiple times with the same input, and it is created from a complex model trained off of unfathomably large amounts of data. The generative art we will be looking at is completely predictable and runs off of a much simpler set of instructions. For clarity, we will be referring to what we are doing as “plotter art.”
Plotter art is art that is created by a pen plotter, or any art that is created via a computer-controlled machine. Let’s look at some different methods for making plotter art!
How to Make Plotter Art Files
The idea of creating your own files through code may feel daunting, but don’t fret – there are many tools already out there to help you make your first piece. The resource that is the most developed is Generative Hut. This website focuses on telling stories about how people create all kinds of generative art. It also has tutorials on how the art is made, as well as lists of tools and artists. This one is the most open of the resources I’m suggesting, so if you want to really dig in and learn all about plotter art, Generative Hut is the best place to start!
The next website I recommend is Drawingbots, particularly for their “Tools” page. This has a list of various tools people have created to assist in creating SVGs (scalable vector graphics) specifically for plotters. Some of my favorite designs are flow lines, squigglecam, and multiplication mandalas. This is a great place to explore or to create your own work using other people’s tools.
Another resource is PlotterFiles. This is a website where people post work designed to be used on a plotter. After making an account, you can download files you find interesting and make them use some of the methods we will go over in this blog.
For this blog, I created a file using TinkerSynth, but feel free to try out any of the tools above to create your own plotter art!
Plotter Art with the Cricut
For the first method of making plotter art in Ignite, we will look at the closest thing we have to a pen plotter: the Cricut! While the Cricut is normally used for cutting materials, you can also use it to have a pen trace out lines. Knowing this, we can upload our SVG and have the Cricut draw it.
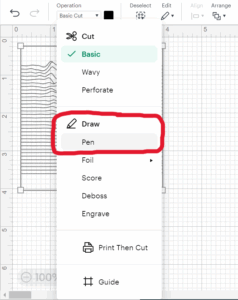
For basic info on using the Cricut Maker, check out this blog! The most important thing to remember is to set your operation to “pen” before you send it to the machine!
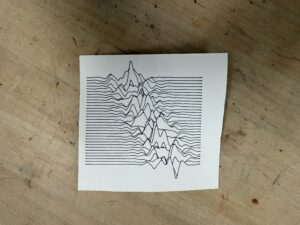
Here is the result once the Cricut traced everything out:
Plotter Art on the Embroidery Machine
Pens aren’t the only material you can use to plot – you can also use stitches! On the laptops in Ignite a software called Embrilliance StitchArtist is available for you to create custom embroidery files. By importing an SVG into this software, our embroidery machine can stitch out the design for you.
Digitization can be a bit tricky. Since we are using an SVG, check out this video to learn how to work with SVGs in Embrilliance. If you need to learn more about how to run the embroidery machine, check out our event calendar for the next Embroidery Machine Quick Start! Session, where a staff member will show you how to get started.
Once you have moved your file into Embrilliance and exported the working file, here is how a finished project can look:
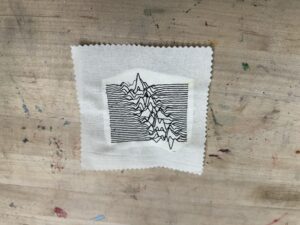
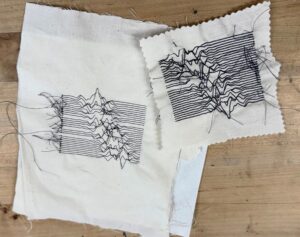
I used a double straight stitch, but some art may work well with a satin stitch! Out of the three methods for plotter art, this is the one that takes the most effort! I made sure to clean up all of the extra strands as the machine was stitching. Here are my first two attempts that didn’t turn out as clean:
Plotter Art with the Laser Engraver
The last method for plotter art in Ignite that I will show today is using the laser engraver. You’ll want to be sure that you have been certified to use our laser. This could even be a good first project to try out the machine with! The laser works great with SVGs since it can follow the lines in the file to make a clean burn.
If you are working with Lightburn you can easily put your SVG directly into the software. If you are using RDWorks, however, you will need to convert your SVG to a DXF. Looking up “SVG to DXF convert” on Google should find you some easy options on how to do this. Once the file is in your chosen software, set the speed and power to whatever you need based on your material.
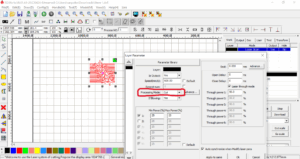
When working with line vectors you’ll usually want to use the “Cut” function. Set to a lower power, the lines will engrave instead of cut through despite the name of the function.
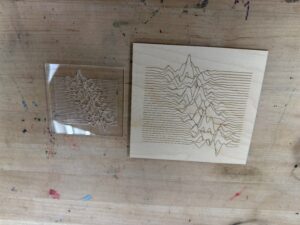
Here are two examples cut at different sizes and on different materials. I used clear acrylic on the left and 3 mm plywood on the right.
Other Ways to Use Plotter Art
While tracing a line is a common way to use these tools to make art, you can still use the SVGs in other ways too!
You can make a linocut from the output, giving an analogue spin to this kind of digital art. Likewise, you can use the files with our Screen Printing Kit to make tote bags or t-shirts. You could also take multiple works and layer them with our Rrisograph to make a cool poster. Post your plotter art makes to our Ignite Community Discussion Board on Facebook. Have fun plotting!
