

by Wil C.
Relief cut printing is a great way turn your digital art into something uniquely physical. This blog will walk you through how to prepare your digital art for the Relief Cut Printmaking Kit and show you a few ways to transfer it onto the block for carving.
Preparing Digital Art for the Block
The blocks available in our Relief Cut Printmaking Kit are about 3 by 4 inches, so make your artwork to fit within that size. Adobe Illustrator is a good choice for making your art as you can easily change the size of your drawing without losing quality! With other programs like Photoshop, MS Paint, or Procreate, you can also make your canvas size 3 by 4 inches, or you can use a canvas with a 3:4 ratio at a larger size and scale down later.
You will want to consider how relief cut printing works when creating your image digitally. When you make a block for printing there are only two parts to the print: where the block touches the paper and where it doesn’t. This is also known as having a “positive” area and a “negative” area, where the positive is the inked part – your design – and the negative part being the blank space in between. It’s easier to think about if you only design in black and white, although there are other options for multi-color relief cut prints. When you create your design digitally, only use black and white to differentiate where the block will touch the paper (in black) and where it will not (in white.) If it’s your first time carving try to keep the design simple. Here’s an example of a black and white digital image created for block printing:
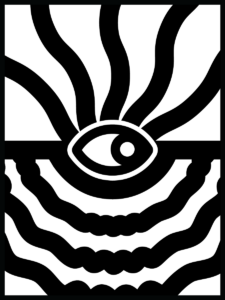
Once your design is finished, there are a few things you can do to make transferring your design to the carving block easier. The first is to use the tools in your design software to create a negative version of your design. Since the black area is the positive of what we want shown when we print, creating a negative version of your image will help differentiate between the areas you want carved away and the areas you want to keep. Making a negative will turn your “carving” areas black instead of white, as it’s easier for some to remember to cut out dark parts from the block instead.
The other thing you should do in your design software before you move to transferring your design is to mirror your image. Anything you carve into the block will be mirrored when you use the block for printing. If you want your design to look exactly like it looks on the computer, then remember to mirror your design before transferring! This is especially important if you have text in your design.

You can see here I took my original design and made a version that switches the black and the white, and I also mirrored the design. Now onto the transfer!
Transfer Your Image to the Carving Block
Pick a material
Currently our relief cut kit has two types of material you can use for carving – either gray linoleum or pink rubber. If it’s your first time, use the pink rubber because it is softer which makes it easier to carve. I will use the rubber for this design.
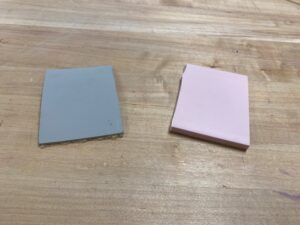
Gray linoleum on the left and pink rubber on the right
Print Your Image
To begin the transfer process you will want to print out the design to scale. If you don’t have a printer at home, you can always print it here at the library for a small fee. Here is the HEPL Print Guide. Then you will need to choose one of the following methods for finishing the transfer.
Methods of Transfer
Carbon Transfer Paper
The easiest method is probably using carbon transfer paper to trace your design onto the block. Ask Ignite staff and we will be happy to give you a piece of carbon paper. Here is the basic process.
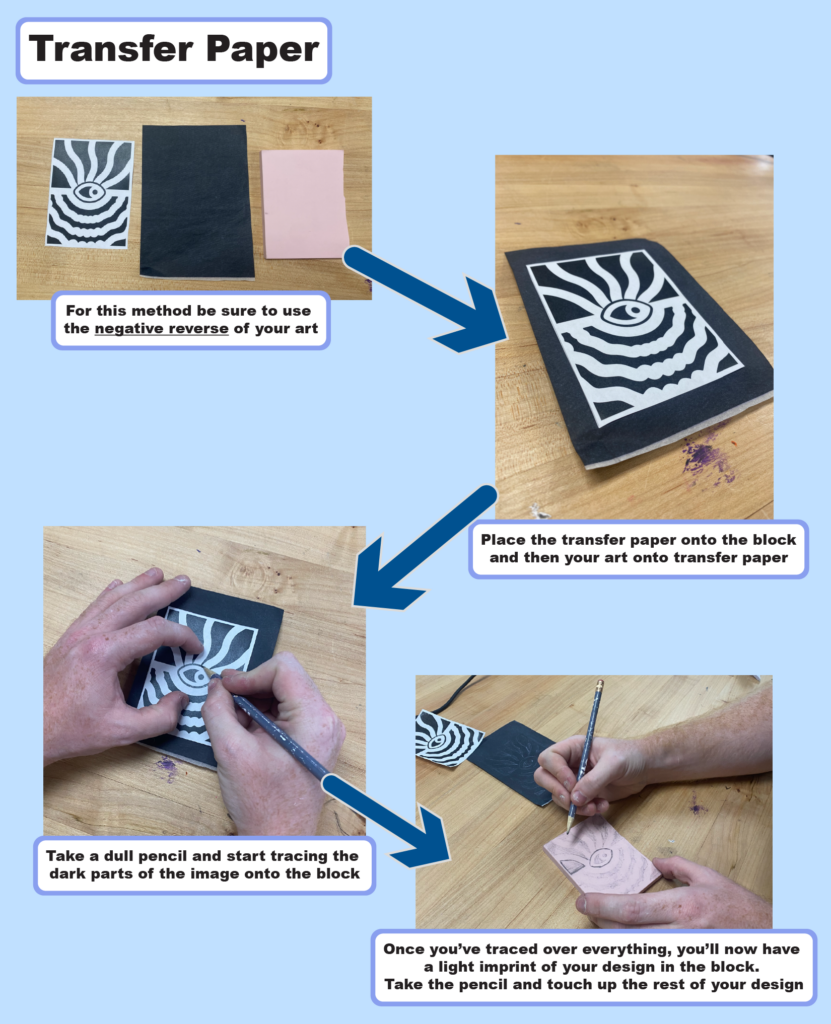
This method is easy to do, but how well it looks depends on your own steady hands. Make sure the carbon paper is face down on your block.
Glue
This method requires a bit of patience but gets a complete image onto your block as you printed it. I used Elmer’s school glue, but you may have a better result with higher quality PVA glue or Mod Podge. Here are the basic steps.
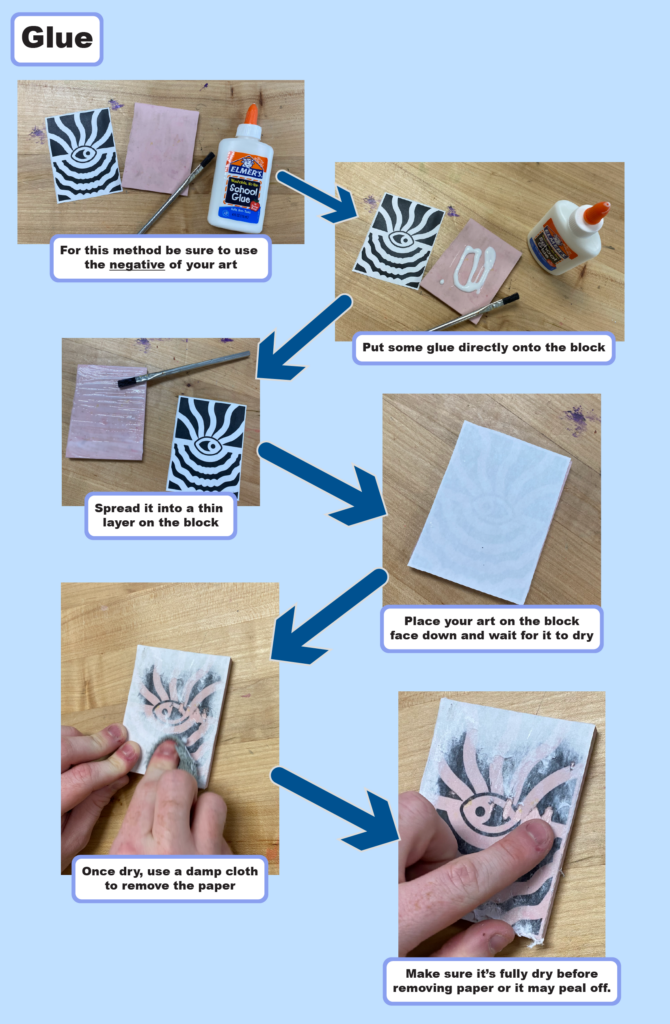
This method requires that the glue be fully set, or the damp cloth will rip off everything. This method will also leave a thin layer of glue on top of your block. A benefit of this process is that you can use either an inkjet or laser printer to print your artwork.
Iron
This method should leave a perfectly fused imprint of your art directly on to your block. You will have to print your digital image using a laser printer, like the ones available at the library. The reason is because the toner from these types of printers fuses to paper using heat. Using that principle, we can fuse the toner to other things too! Here is the basic process.
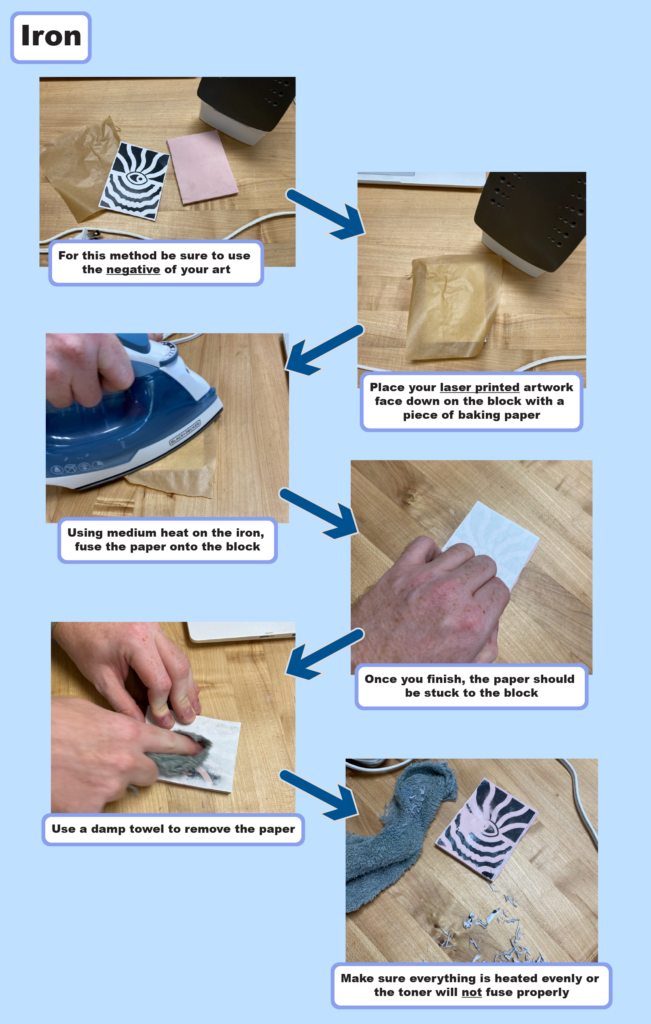
This method had some of the best results for me. However, if you don’t fully heat the paper, it can leave blank spots. Because it is toner is fused to the block it can be difficult to remove it for a second try. Make sure to use even pressure!
Finish the Transfer
Once you have transferred the art to the block using any of these methods you can add an extra layer of color on top to help guide you when cutting out the design. I recommend colored pencils.
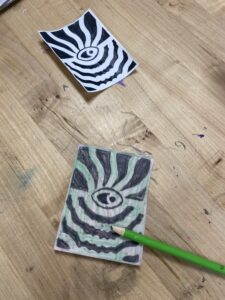
Use a colored pencil to get a better contrast on your carving block.
This will give you a clear visual contrast on where you have and have not carved your block already.
Now get to carving! I recommend checking out this blog to learn more about the carving process. Post your results in the Ignite Community Discussion Board on Facebook. Happy printing!
