

by Katie W.
Needle felting is a fun and easy to learn craft with a variety of applications. It may look complicated and intimidating, but once you learn the basic steps, you can really make anything! Today, I’m going to walk you through a cute little beginner project: needle felted chicken keychains.
Before we get started, let’s go over a couple needle felting basics. First, the word “felting.” Felting is the process of condensing and shaping wool fibers by stabbing them with special felting needles. These needles are barbed, which allows them to catch on the wool fibers. Second, while the finger gloves are technically optional, I cannot recommend them enough! Stabbing yourself while felting is painful and can occur often. Protect your fingers with the leather finger gloves to save yourself the unwelcome surprise. Watch our tutorial video on how to get started for some more safety tips.
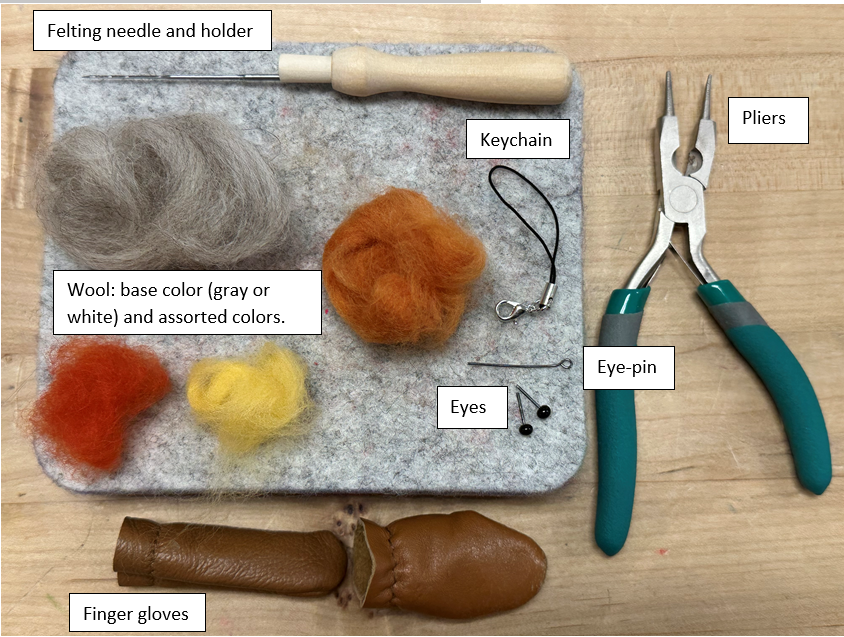
Materials for Needle Felted Keychains
To make this keychain, you’ll need the following materials, which can be found in our Needle Felting Kit at Ignite.
Making the Base
To begin, we’ll need our base wool, finger gloves, and felting needle & holder. The base wool should be either gray or white. The finger gloves go on the thumb and forefinger of your non-dominant hand, as that is the hand you will be using to hold your wool.
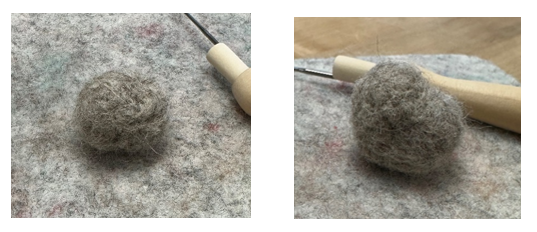
Before felting the wool, roll it between your hands like a ball of dough for a minute or so. This motion helps agitate the fibers, speeding up the felting process. Then, begin felting your wool by poking the fibers with the felting needle over and over. Be careful not to stab your fingers in the process. Felt the wool until it has formed a dense little ball that holds it shape and only squishes a little bit. This ball will be your chicken’s body.
To make the chicken’s head, felt a smaller, flatter shape than the body. Then, connect it to the top of the body. You will use the felting needle to felt the point of contact between the two until the shapes hold onto each other.
Adding Color to the Base
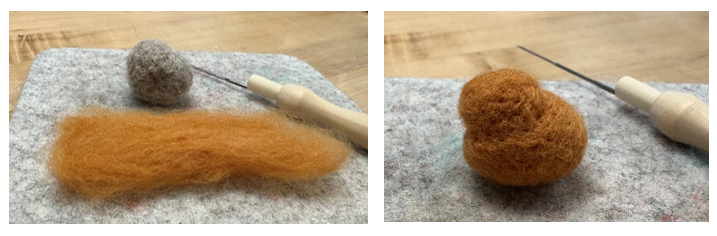
Now that your chicken’s base is finished, it’s time to add some color! To do this, you will wrap some of your colored wool around your ball and felt the colored fibers in in. I chose brown and orange for this chicken. Do this until the base shape is completely covered in the color of your choice.
Next, it’s time to make the tail! Felt more of the same colored wool into a little triangle. Then felt it onto the back of your chicken’s body on the opposite side of the head. Felt it in so that the shapes are mostly merged, but leave a little bit at the top sticking out.

Adding Details
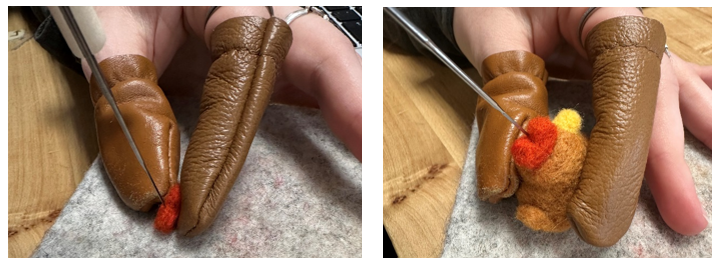
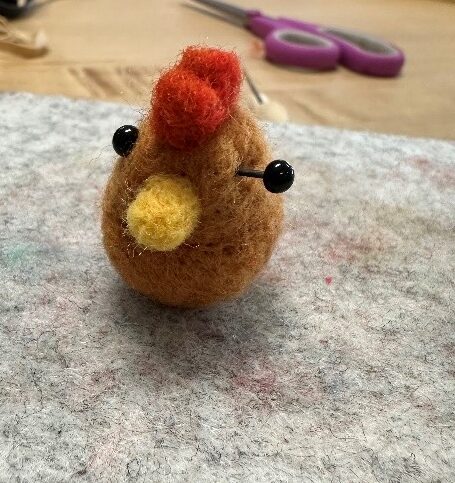
Now it’s time for the details! Felt a tiny bit of the yellow wool into a conical shape for the beak. Then, felt it into the chicken’s “face.” Next, felt a little bit of red wool into a flat half-circle, with a divot in the middle to make two humps. This will be the chicken’s comb. Felting something this tiny can be a bit challenging. I recommend alternating between laying the piece flat and felting into the mat, and pinching the wool between your fingers, and poking it as pictured below. When your chicken’s comb is felted to a proper size and density, position it towards the front of the head in the center. Felt it into the top of the chicken’s head.
At this point, your chicken should look distinctly chicken-like. It just needs some eyes and it’s done!
To insert the eyes, use the needle to poke a hole where you’d like the first eye to go. Poke this hole multiple times so that it’s nice and big, but make sure you’re only going halfway through the head and not all the way through. Then, insert one of the plastic eye brads into the hole, pushing slightly and twisting to secure it. You shouldn’t need to use a lot of force, so if the eye won’t go in, remove the eye and widen the hole some more. Once your first eye is in, repeat the same process with the second eye.
Adding the Keychain
Congratulations, you’ve made your first needle-felted chicken! You can stop here if you’d like to keep the chicken the way it is, or you can turn it into a little keychain to take your chicken along with you on your adventures. To add the keychain, start by poking a hole in the top of the chicken right behind the head, the same as adding the eyes. Unlike the eyes however, the keychain is going to be pulled on frequently, so it needs to be a little more secure.
Grab some pliers and an eye-pin. Use the tip of the pliers to bend the eye-pin into a hook shape. Then, use the flat part of the pliers to flatten the hook.
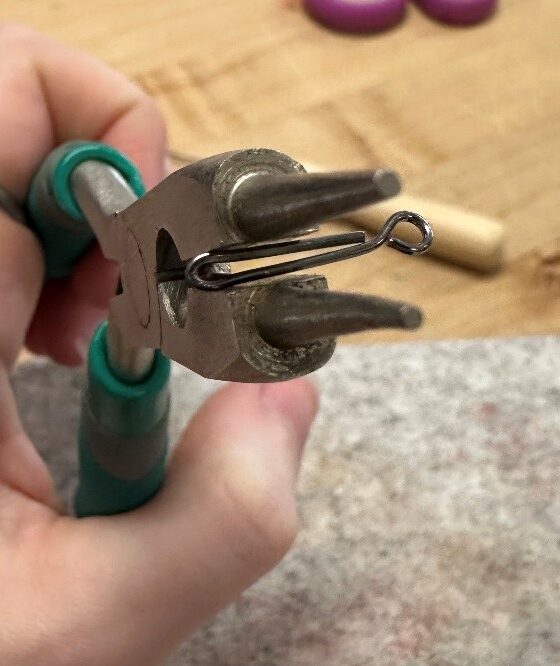
Insert the eye-pin with the hook side down into the hole you made in the chicken’s back. Push, twist, and pull the hook until you feel it catch on the wool. When you tug on the eye-pin, it should not slide out. For the last step, clip the keychain onto the top of the eye-pin.

Now that the keychain is installed you can carry your new friend around with you wherever you go!
Post your needle felted makes on the Ignite Community Discussion Board on Facebook. Happy Making!
