

by Wil C.
Ignite has an exciting new piece of equipment: the Brother nq1700e Embroidery Machine! With this machine you can embroider beautiful designs onto towels, tablecloths, Bags, or ever clothes! This machine has so much to offer, but it can be intimidating to have so many possibilities. Fret not! This blog will take you step-by-step on how to make a custom text-based design using the function built into the embroidery machine, no computer needed! Read on to learn how to do this beginner embroidery project: text tees.
Beginner Embroidery Project: Text Tees
Most materials needed for this project are available in Ignite Studio. Here is what we have:
- Embroidery Machine
- Embroidery Thread
- Embroidery Bobbins
- Embroidery Hoops
- Fabric Stabilizer
- Temporary Fabric Pens
- Fabric Scissors
- Scrap fabric for testing
Wow! That’s almost everything you need! Now what do you need to bring?
- Plain T-shirt OR Any other fabric item you what to embroider on, like a tote bag or jacket
So easy! You can get plain T-shirts for a fairly good price in a hobby store. You could also look at different apparel shops if you prefer a certain brand. My preferred t-shirt brand is Comfort Colors! You could also get shirts at a secondhand store if you like. Important note! While you can embroider on thin T-shirts, thicker T-shirts are a bit more stable for the job.
Starting/threading the embroidery machine
When you arrive for your appointment, you’ll want to thread whatever color you want your text to be. While it is possible that you can have your text be more than one color, this tutorial will only use one. To turn on the machine, all you need to do is flip the switch on the right side of the machine.
For threading and other general use tips, click the help button (? and a sewing machine). This will give you step-by-step instructions on how to set up the various parts of the machine. Pick the one for threading and it will guide you! If you still are having trouble, ask Ignite staff for help.
Other than the main thread, you should also check the bobbin. The bobbin holds the thread that stitches on the underside of your design. It is in a chamber under the needle. Like threading the main thread, if you need help threading the bobbin, press the help button and follow the instructions, or let Ignite staff know you need some help. If the bobbin is over halfway full you shouldn’t need to change it.
Hooping the shirt
Hooping is what you do so that your fabric stays still while embroidering. This part can be a little tricky but take your time and you can do it! This project uses our medium-large hoop. You’ll also need to pick a stabilizer for this part. For T-shirts, I recommend the thin mesh cut away stabilizer. However, you might consider others depending on your fabric.
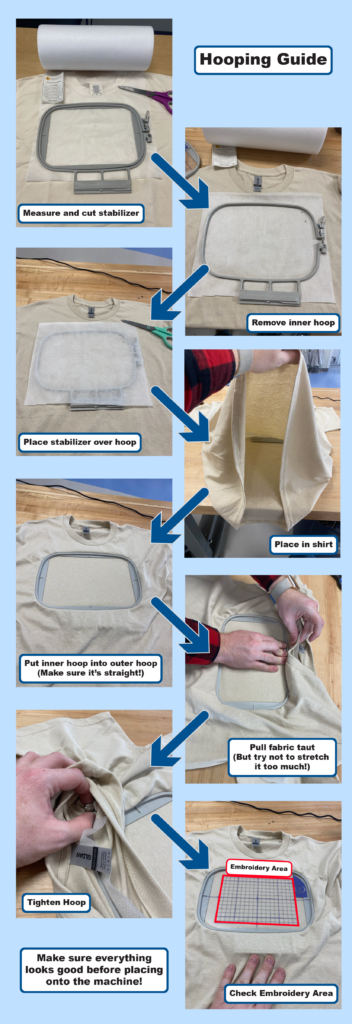
One you finish the layers should be as follows:
- TOP
- Inner Hoop
- T-shirt/Fabric
- Stabilizer
- Outer Hoop
- BOTTOM
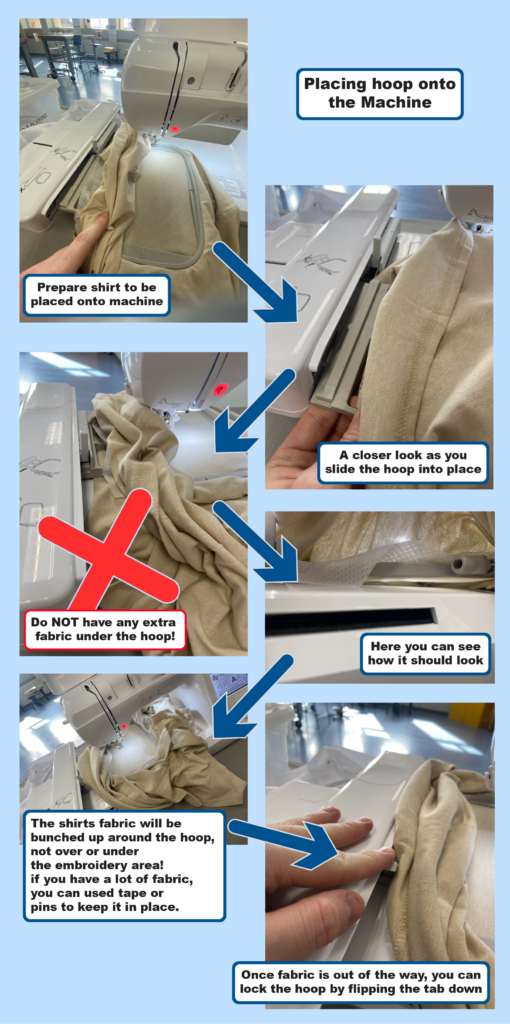
Once the fabric is set into the hoop straight, you can now set it into the machine. Be careful not to pop it out of the hoop by mistake. Here’s what you need to do:
Once your hoop is on, you can move onto setting your text.
Text setting
The Embroidery Machine has a built-in text function for embroidering and editing text. Here is how you can get to the plain text function:
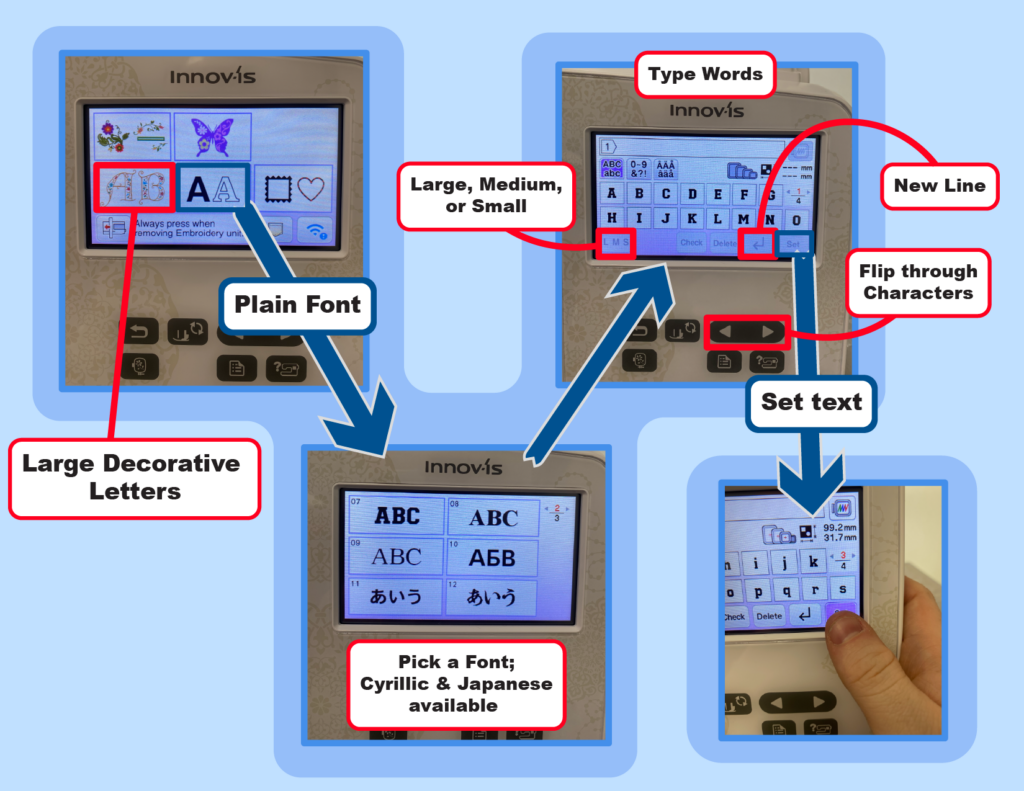
Here are some things to note while typing out your words.
- L, M, S are the three main sizes for embroidery. You can slightly change these sizes later, but since embroidery is designed using embroidery software (like embrilliance), it is designed specifically to embroider at those sizes.
- If you start putting too much text it will ask if you want to turn it 90 degrees. Be sure to keep in mind what orientation the hoop is compared to your fabric.
- If you put too much text at a large size, it might automatically switch to a larger hoop. Make sure your design fits in the second biggest hoop (7” X 5”) before you start to embroider.
- EMBROIDERING A LARGE DESIGN ON THE WRONG HOOP CAN DAMAGE THE MACHINE! If you aren’t sure, please ask Ignite staff for help.
- You can change the hoop size in the settings but let Ignite staff know if you did.
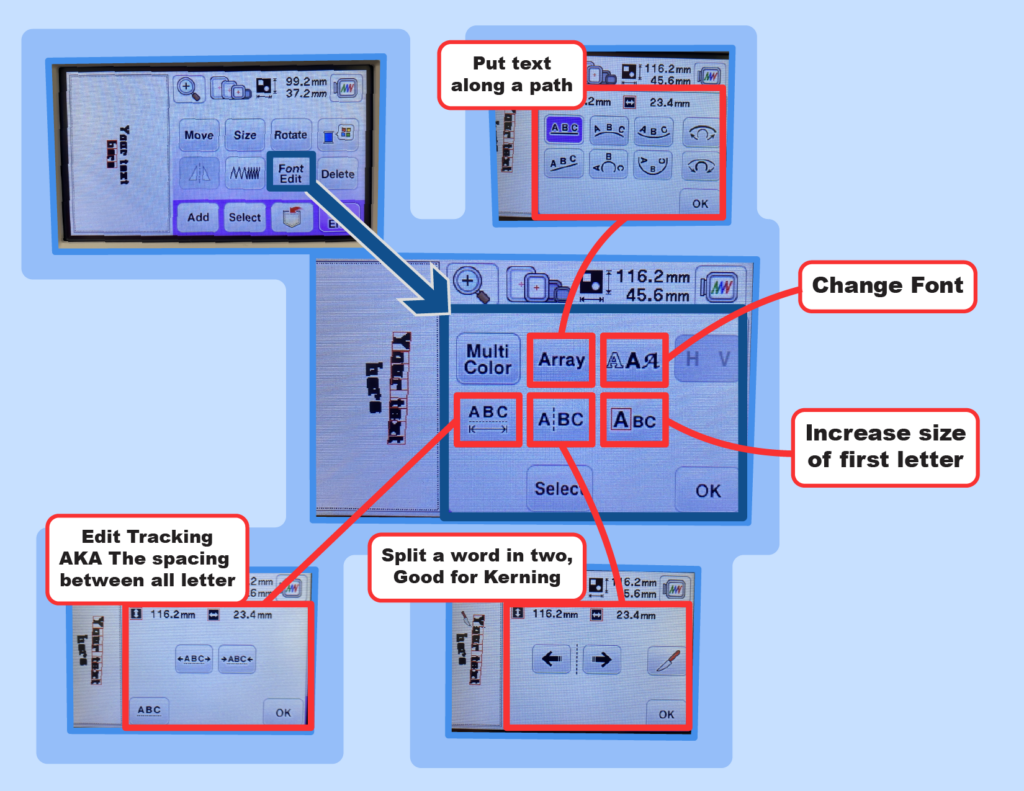
Once you finish inputting your text, you can do some additional edits. Here is a chart have all the ways to edit your design:
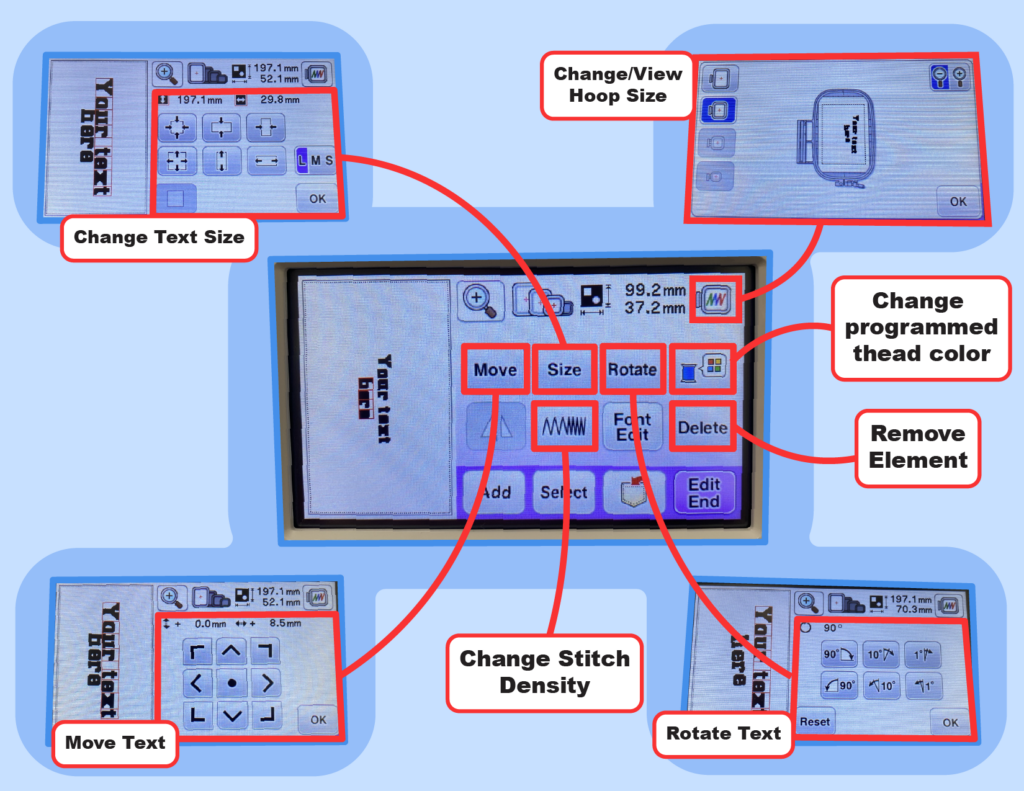
There is also a tab specifically for editing text!
Once you have placed and edited your text how you like, you can start embroidering! All you need to do is press “End Edit” then “Embroidery.” You’ll then be in the embroidery screen that shows you all the colors you’ll be using for the project (probably just one color this time). You’ll then press the up-arrow button located over the needle. If it’s red, then you’ll need to lower the presser foot using another nearby button (Right of the scissor button).
From there is should go, if you have two lines of text you may need to press the up-arrow one more time, but you shouldn’t need to rethread unless you plan to change colors.
Finishing
Once the embroidery finishes, you can take the shirt out of the hoop and clean up the design. There may be some extra threads that you can cut to clean up the design.
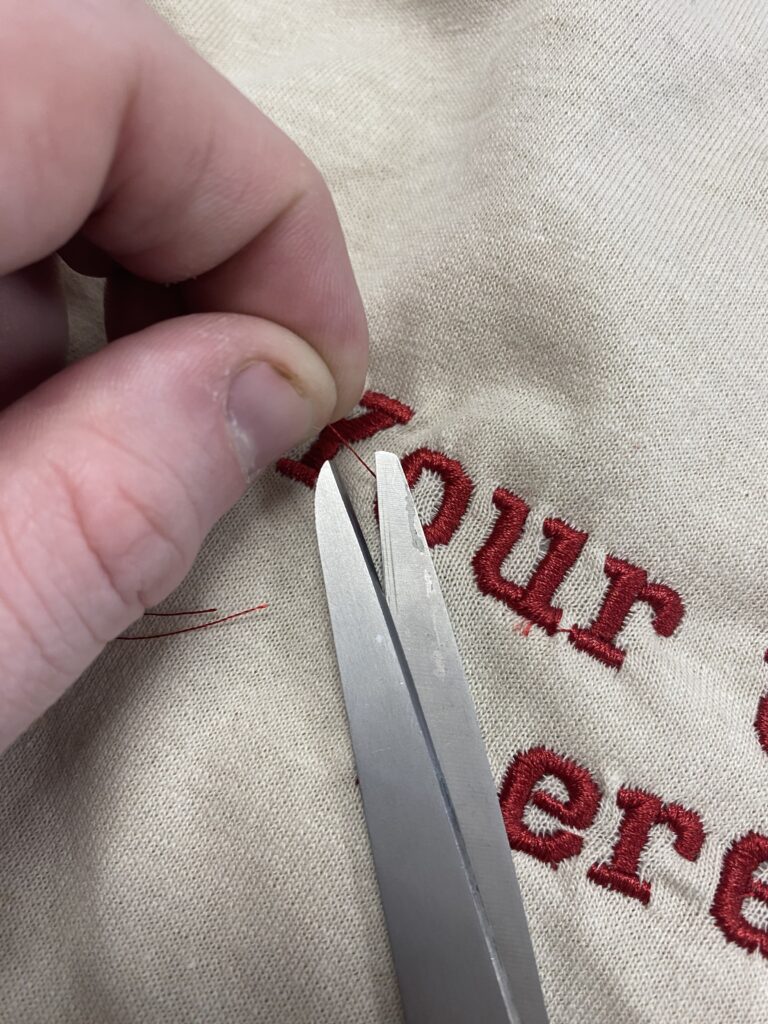
You’ll also need to flip the shirt inside out to cut way the excess stabilizer.
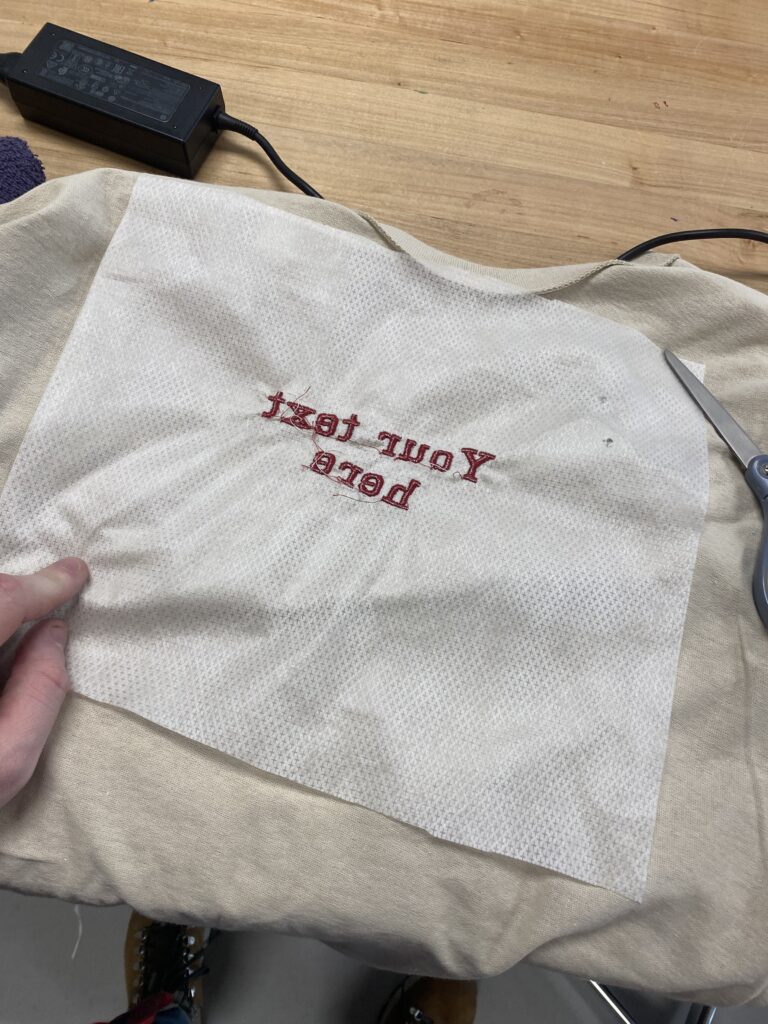

Be careful when cutting away the stabilizer not to cut the shirt! The final product here is tilted since I used the rotate function on the text, but it will default to straight if that’s what you prefer.
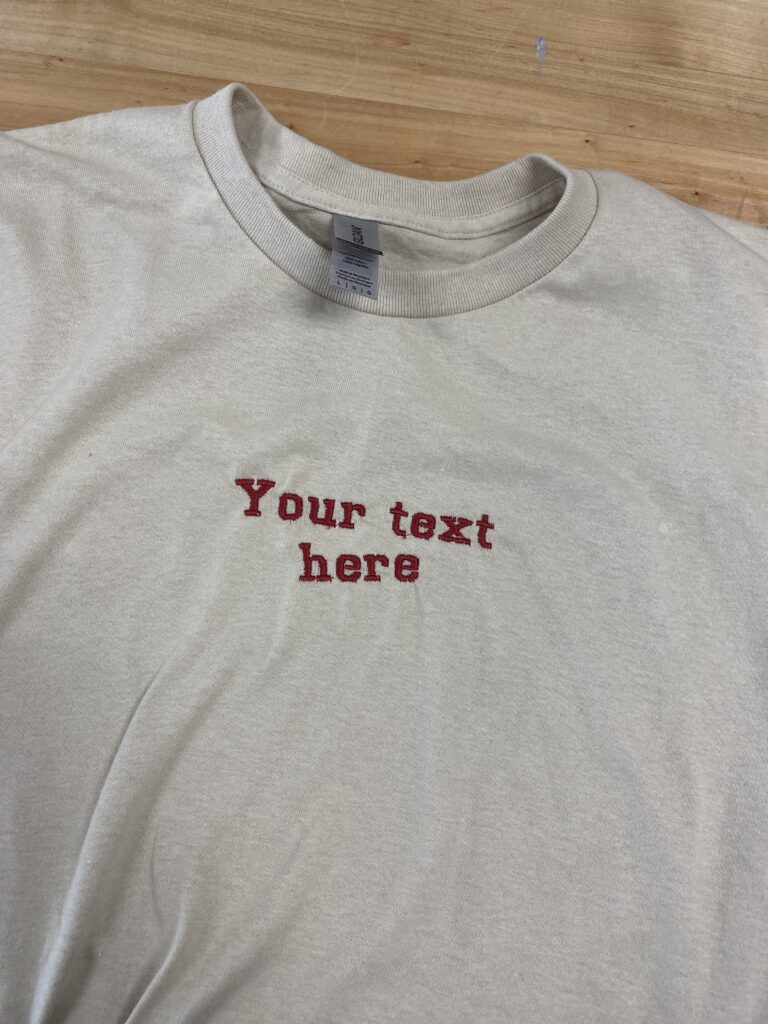
Once you’ve completed this guide you’ve taken your first steps into machine embroidery! Next you can explore other preloaded designs on the Machine or make your own design using Embrilliance on the Ignite Laptops. Whatever you choose, Ignite will be here to help!
