

by Wil C.
Flashprint, the basic 3D print slicer introduced to you during 3D printer certifications, is still available for patrons to use in-studio, but we are now offering Orca-Flashforge as well for those who want a little more control over printing. While Flashprint can be good for basic slicing, Orca slicer gives you more customization options. It also prepares your file for other slicers like Bambu Studio or PrusaSlicer.
In this Part 1 blog, you’ll find a basic primer on how to prepare and export your 3D models in Orca-Flashforge specifically for Ignite’s 3D printers.
Getting Started with Orca-Flashforge
These instructions assume that you have already gone through the certification process that is required for use of our 3D printers. If not, please go through the certification process which you can begin HERE. Note: If you are 13-15 years old you must get certified alongside an adult who must accompany you each time you use the printer. If you are 16-17 years old you may use the printer independently, but you must have an adult sign the safety and liability waiver during your in-person training.
Orca-Flashforge is free to download on Flashforge’s website, so you can easily do this tutorial from home. However, if you use the slicer at home, Ignite staff will still need to see the weight of the print to make a ticket when you visit the studio. We will also have the software available on our laptops in-studio at Ignite.
Setup
When you first install Orca-Flashforge, the software will prompt you with a few questions to help set up your workspace. Here is what you should fill in for use in Ignite:
![]()
Configure the main printer and filament settings as follows:
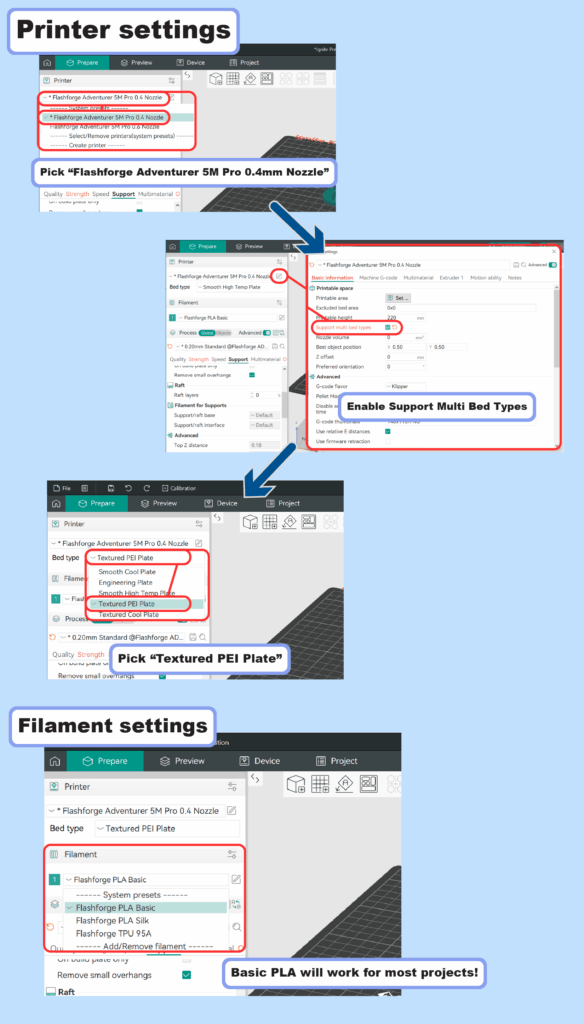
Also, under “Process” be sure to turn on “Advanced.”
Slicing with Orca-Flashforge
Orca-Flashforge and Flashprint have the same utility: “Slicing” your 3D model into thin strips to be 3D printed. While the two interfaces look quite different, they are used for the same thing and have the same workflow.
- Import your .STL or .OBJ > Orient Objects on the bed > Plan Supports > Edit Process settings > Slice > Export G-Code > Print
Since this blog assumes you have a basic knowledge on how to use Flashprint, the focus of the following content will be on where to find important settings for slicing in Orca-Flashforge.
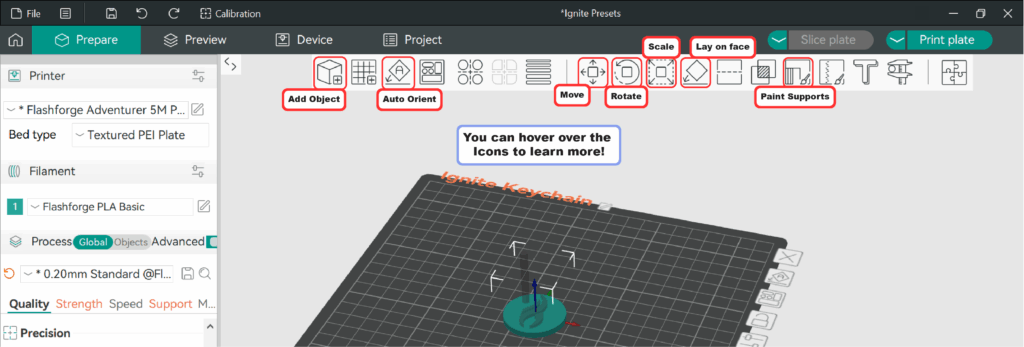
Orient Your Object
Once you add your object, you can use the setting at the top of the window to move the object around.
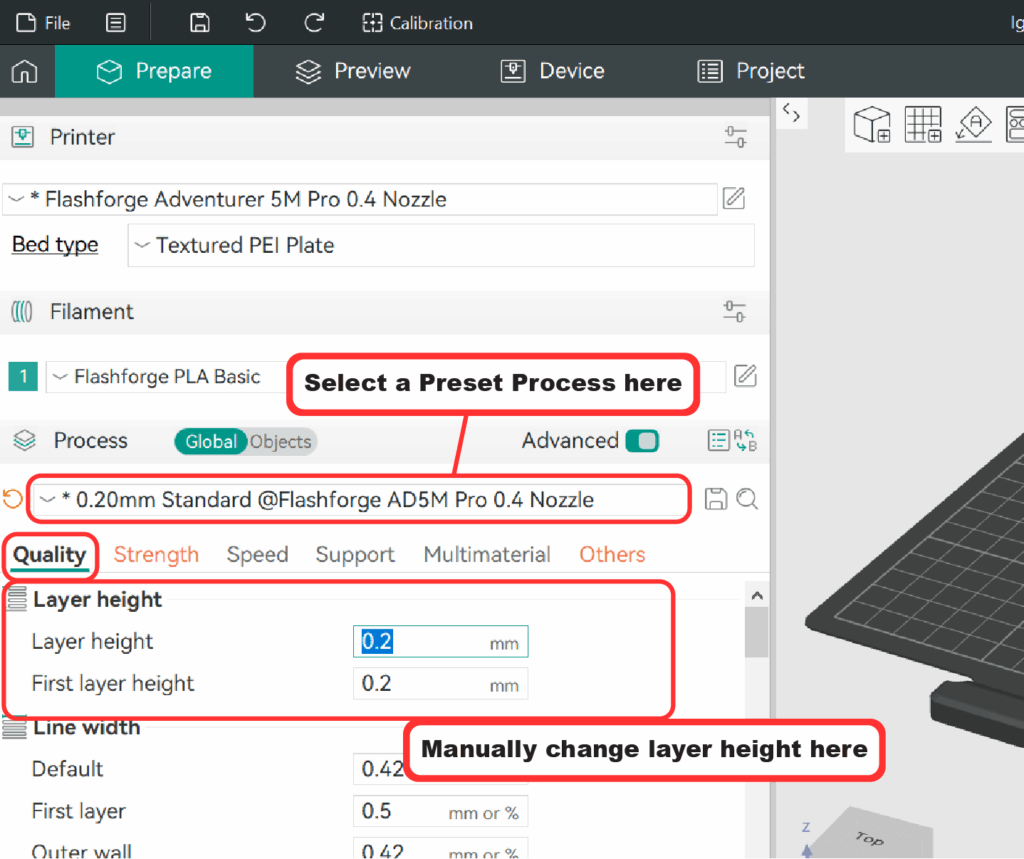
Quality
You can decide how thin your slices are when setting up your print. The smaller the layers, the more detailed your print will be. However, it will take longer to print. Here is where you can change those settings, but we recommend sticking to one of the three presets:
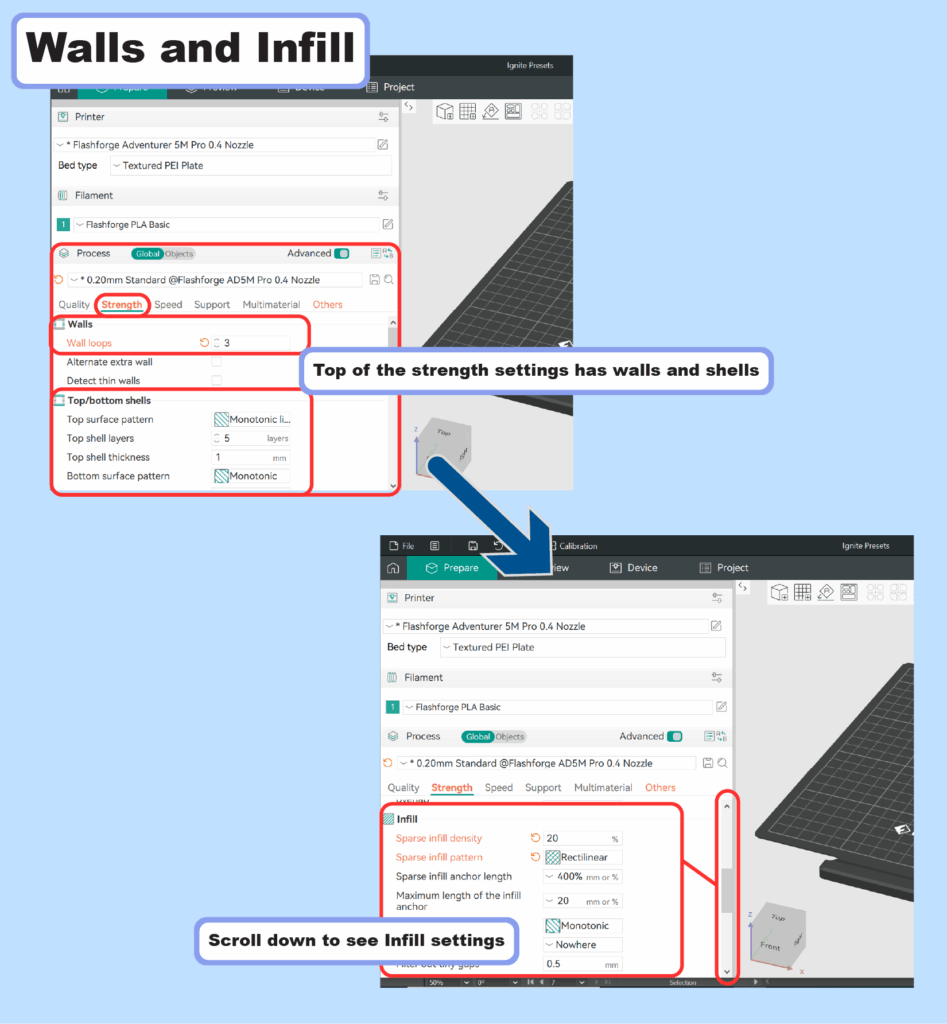
Walls and Infill
Under the “Strength” tab you can change the settings that determine the strength of your print. “Walls” are how many solid lines it will print around your model. “Shells” are the solid layers at the top and bottom of your print. “Infill” is how the printer fills in the inside of your model. Here is where you can find and modify these settings:
Supports
One of the important parts of 3D printing that determines how successful a print can be is supports. Flashprint asks you to add supports before you slice, but Orca will generate supports during the slicing. Here’s some basics to know about supports:
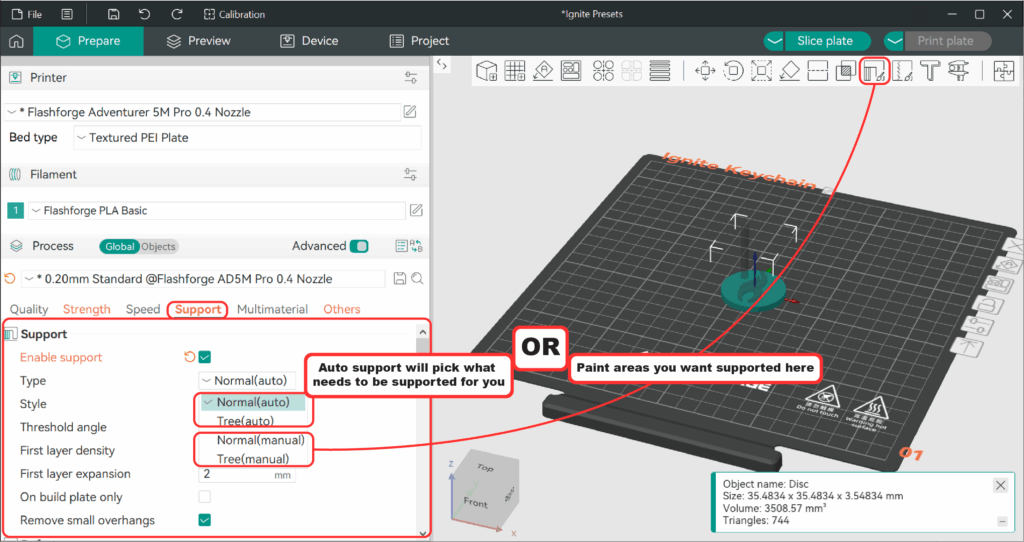
Orca-Flashforge is much more reliable at generating supports for your models than Flashprint, especially when using tree supports.
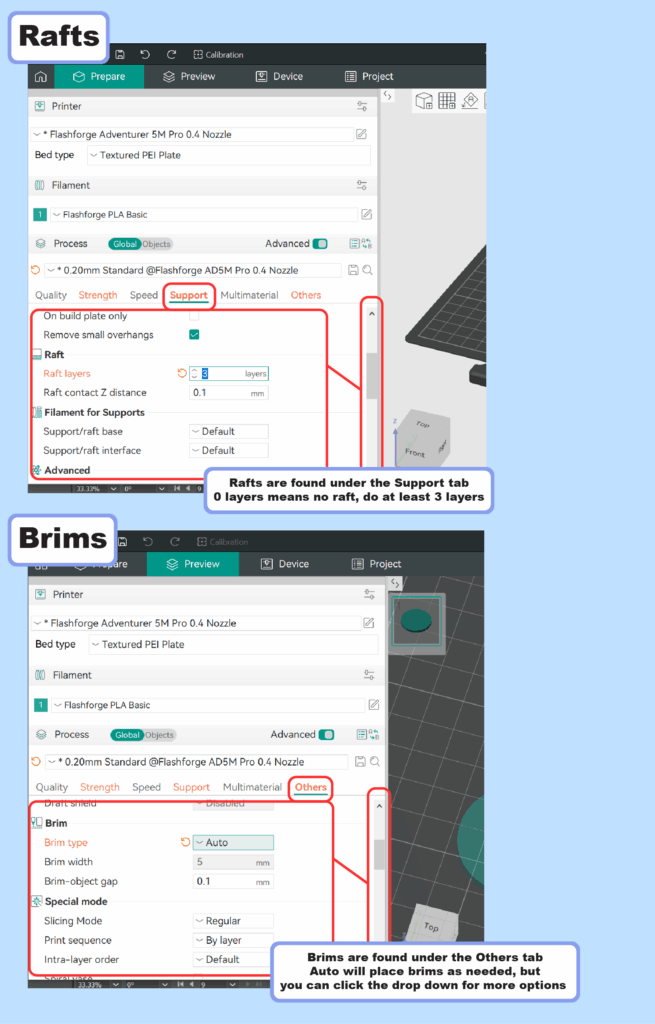
Rafts and Brims
If you have a print with very small points of contact, you may want to set up a raft or brim to help it stay attached to the bed. The smaller the surface area of object contact to the bed, the more likely you are to need a raft or brim. Here is where you can find those settings:
Prepare to Print
Once you have all of your settings tuned in, you can then prepare your model for printing. Here are the steps to take to get the .gcode file of your model:
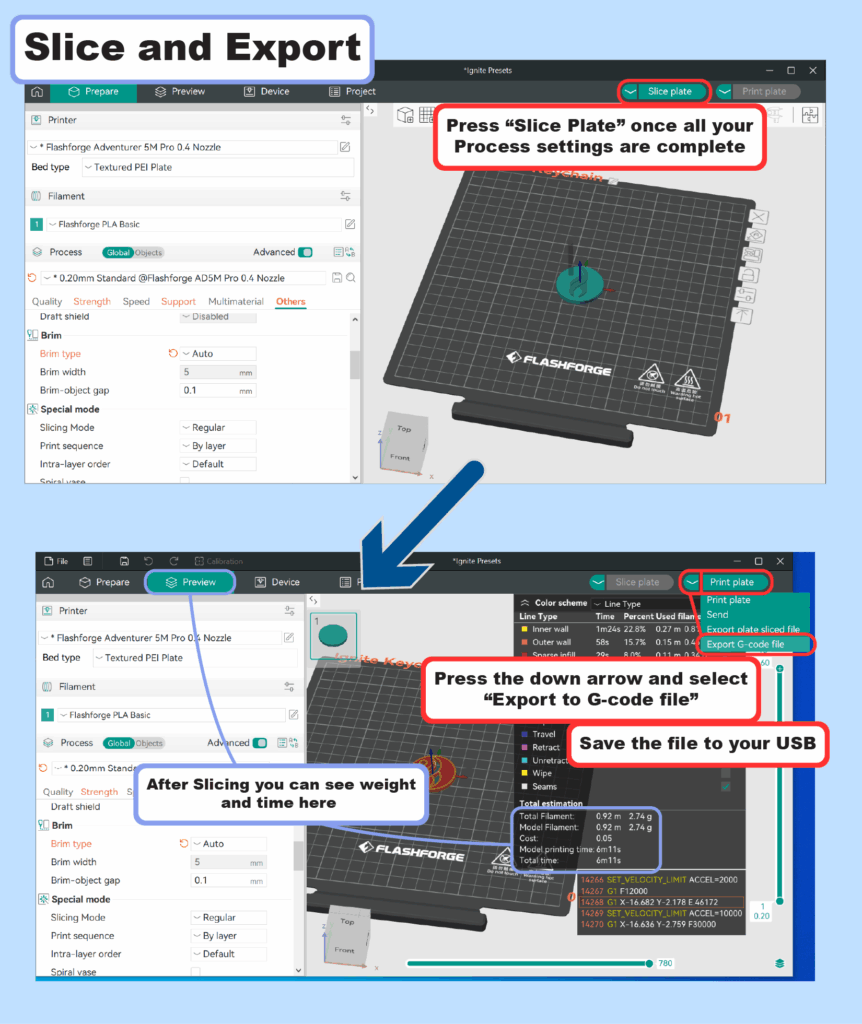
You have the option to save all your settings by saving your project as a .3MF file. This can be helpful for complicated models with lots of supports, or if you do this process at home and need an Ignite staff to review the weight of the project before you print.
Print!
Once you have saved the .gcode file of your object onto a USB drive, you can then go about preparing the printer as trained in the certification.
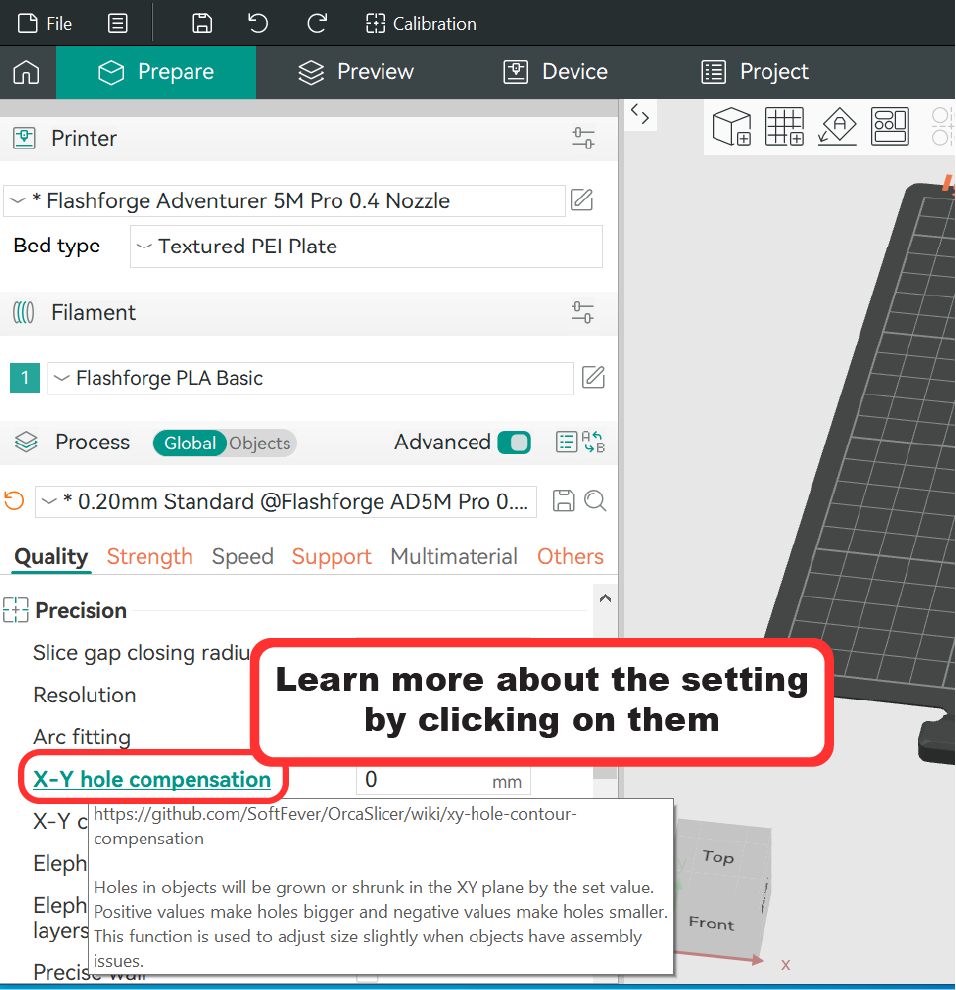
As a final note, if you want to learn more about different settings, you can click them like so to reveal more information:
Thanks for learning more about how to prepare 3D models! In the forthcoming Part 2 blog on Orca-Flashforge, we will look at settings that aren’t offered in Flashprint and are mostly exclusive to Orca. Post your 3D printing questions or successful makes onto our Ignite Community Discussion Board. Happy Making!
